

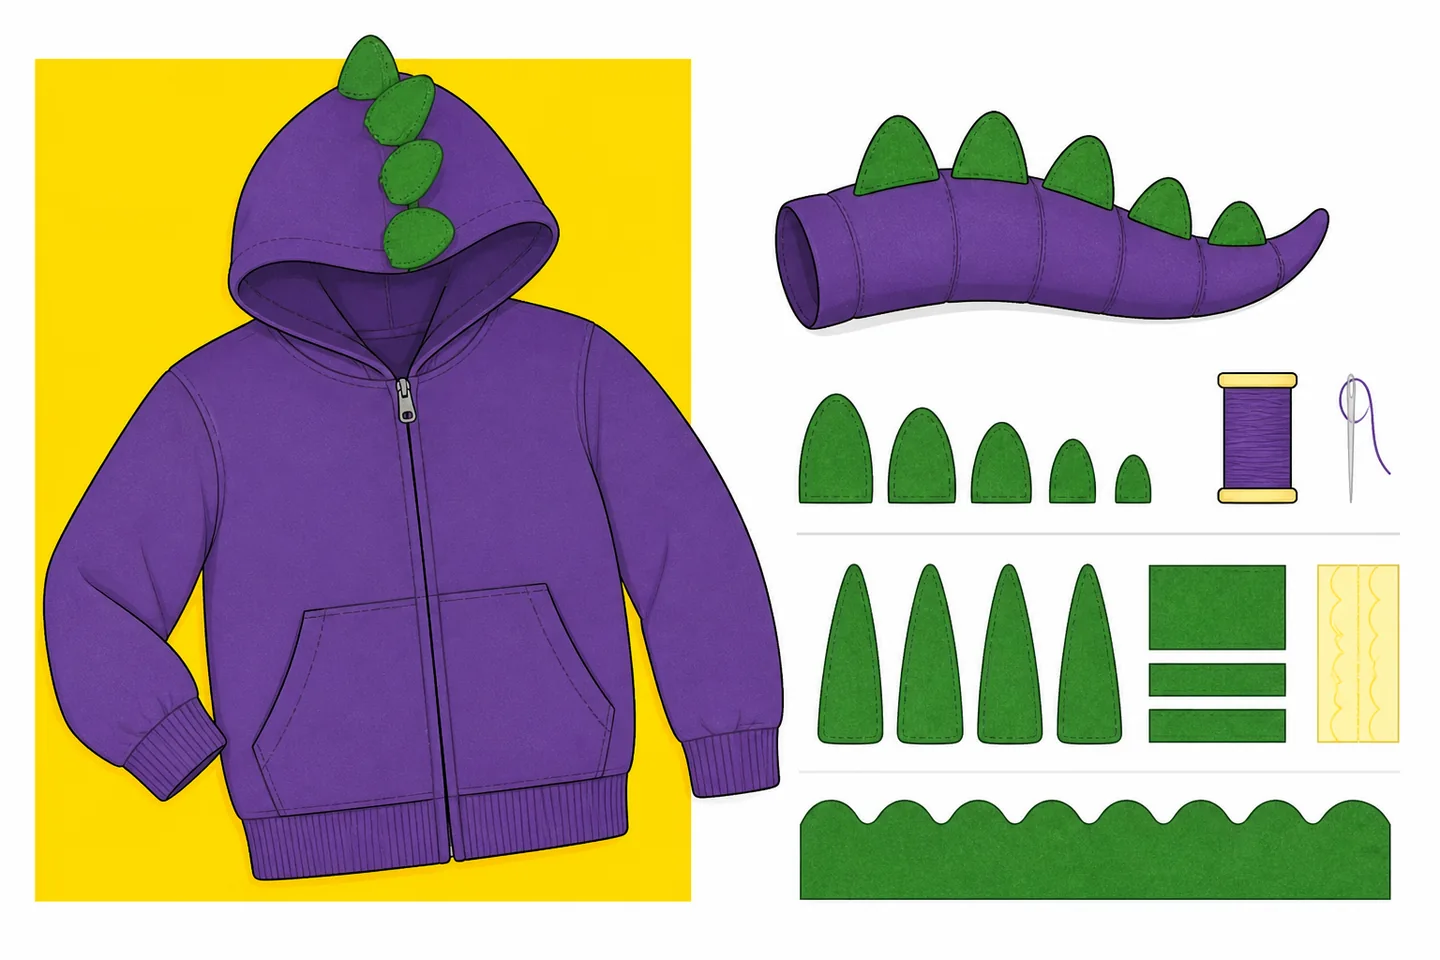
A Spike the dragon costume can start with purple clothing, green spines and a soft tail. Build around those shapes before adding scales, claws or face details. This guide uses a generic purple and green dragon design, with practical options for choosing a base outfit, making attachments and checking the finished fit.
For a character reference, see Hasbro’s official character page. Decide which visual details matter to your wearer, then simplify anything that interferes with movement. A costume for walking outdoors needs different proportions from one worn briefly for photographs.
Choose a base that suits the event
A purple top and trousers give you a straightforward starting point. Separate garments make changing and bathroom visits easier, while leaving room to remove a warm layer. A hooded top offers somewhere to attach spines without making a separate headpiece. Try the clothes on before cutting any decorative pieces.
A one-piece outfit gives an uninterrupted body shape, but check how it opens. The wearer should be able to reach the fastening, or have help available. Sit down, bend forward and raise both arms: fabric that pulls at the shoulders or crotch needs more room before decorations are added.
If buying a costume, compare the supplied measurements with the wearer rather than relying on an age label. Check what is included and whether the tail or hood comes off. Read the cleaning instructions too; a garment with glued details may need different care from ordinary clothing.
For outdoor use, fit the base over the layers you expect to wear. For a warm room, use fewer layers and make the hood removable. Keep the main dragon details visible when a coat is added, without fastening decorations through the coat or restricting its opening.
Make soft spines and a manageable tail
Sketch a side view on paper to decide where the spines will run. A short row along the hood and upper back can suggest the shape without covering every seam. Cut a paper template first and hold it against the garment to check scale and spacing.
For simple spines, cut matching triangles from green fabric, round their tips and sew each pair together, leaving the base open. Turn them out where the fabric allows and add only enough soft filling to hold the shape. Close the bases and stitch them to a fabric strip.
Attach that strip to the garment with stitching suited to the fabric. Keep stitches clear of drawstrings, zips and hood openings. Check the inside for scratchy seams. Avoid wire supports or rigid points: the spines should fold when the wearer leans against a chair.
Make the tail from two tapered fabric panels sewn together and lightly stuffed. Start shorter than your sketch suggests, then test the proportions on the wearer. It should clear the floor and leave space to turn through a doorway without sweeping objects from a nearby surface.
Position the attachment so the tail does not pull the waistband down or twist the top. A removable tail is useful for seated activities and travel. Try its fastening repeatedly before the event, checking both that it holds during walking and that an adult can remove it easily.
Before attaching the tail permanently, mark its position with the base garment laid flat. Check that the attachment does not cross a pocket opening or cover a fastening. Spread the support across a fabric patch rather than pulling on a single small point. Inspect the garment for puckering after stitching, then repeat the sitting test with the finished tail in place.
Keep the head and hands uncomplicated
A soft hood or simple hat can carry the green crest. Check it from the side as well as the front: a hood that looks clear of the eyes while standing may slip forward when bending. Remove dangling cords and leave the face unobstructed.
Add fabric eyes or nostrils to the top of the hood if you want a face detail. Position them while the hood is being worn, then remove it before sewing. Flat fabric shapes avoid the bulk of a rigid mask and leave facial expressions visible.
Ordinary gloves can suggest dragon hands through colour alone. If adding fabric claws, keep them short and flexible, and check that the wearer can grip a door handle, carry a bag and undo clothing. Leave them off if they make these tasks awkward.
Check walking, sitting and visibility
Test the complete outfit with its intended shoes. Sleeves should clear the hands, trouser hems should stay off the floor, and the tail should remain behind the wearer. Walk, turn, sit and climb a few steps with supervision where needed. Adjust anything that catches or shifts.
Use well-fitting everyday footwear rather than oversized slippers or loose shoe covers. If the shoes do not match, repeat their colour in a small costume detail instead of hiding them beneath fabric. The wearer needs a clear view of steps and an unrestricted stride.
For a child’s outfit, consult The AAP’s costume and Halloween safety guidance when reviewing fit and visibility. Include reflective details for outdoor use after dark, and check that a coat or bag does not cover them.
Ask the wearer what rubs, feels heavy or becomes annoying. Spend a little time in the costume rather than relying on a quick mirror check. A rough neckline or tight cuff may only become noticeable once the wearer has moved around.
Inspect materials and decorations
Read garment labels and the instructions for any adhesive or decoration before using it. Follow the specified application and drying directions. Do not assume that adding craft materials leaves a garment’s original properties unchanged, and keep the finished costume away from candles, fireplaces and other ignition sources.
The FDA’s costume safety advice provides further reading for checking costume materials and optional makeup. A dragon outfit does not need flame effects, smoke accessories or elaborate lighting; fabric shapes can provide the detail.
Inspect the finished work for exposed pins, sharp fasteners, loose filling and decorations that pull away. Check again after the movement trial, especially at the tail attachment and hood. For a young child, leave off small detachable ornaments and keep the construction simple.
Makeup is optional. Fabric features on the hood can complete the design without painting the face. If using makeup, follow its labelling and removal instructions, and allow time to try it before the event. Leave decorative contact lenses out of the costume plan.
Prepare for wearing and cleaning
Match accessories to what the wearer will actually do. A lightweight bag can carry small belongings while leaving the outfit simple. Skip handheld props for activities that require both hands. Check access to pockets, outerwear fastenings and the bathroom before leaving home.
Pack a plain change of clothes and a bag for removed costume pieces. Keep any repair tools with an adult. If an attachment comes loose, remove the affected piece until it can be repaired properly instead of leaving a dangling strip or exposed temporary fastening.
After wearing, detach removable pieces and follow the base garment’s care instructions. Clean decorative parts according to their own materials, let everything dry fully and store the tail without crushing it. Inspect seams before the next use, since pulling and washing can loosen previously secure attachments.