
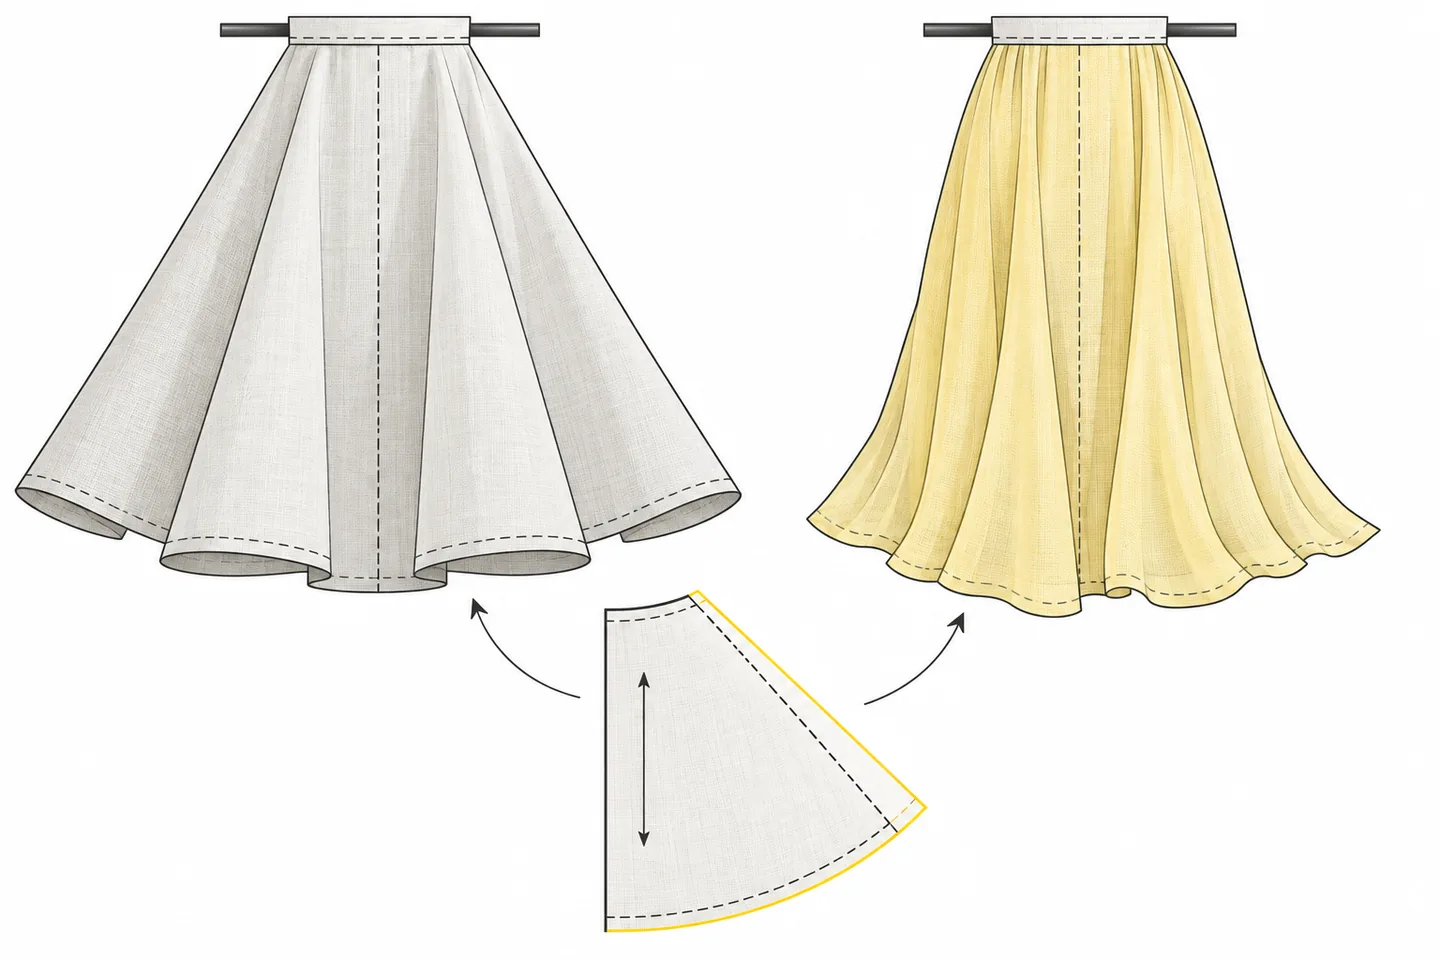
A muslin can fit neatly at the shoulders and waist, yet the finished garment can look different. A crisp test fabric may hold a skirt away from the body while a soft final fabric falls into folds. A light test cloth may hang smoothly where heavier cloth pulls the hem down. The stitching lines may be accurate; the fabric is answering a different question.
Separate two decisions: whether the pattern gives your body the intended room, and whether the chosen fabric produces the intended shape. A test garment can help with both if you know which observations to trust. Record what the test cloth cannot show, and test again when its behaviour could change an alteration.
Choose a test fabric by behaviour
“Muslin” describes the job of the test garment; it need not be a particular cotton. Start with the pattern’s fabric recommendations and your final fabric. Seamwork’s guide to reading a sewing pattern explains how the recommended fabric helps indicate the intended look and whether a pattern is designed for wovens or knits. A woven cotton test will tell you little about the fit of a close-fitting knit garment.
Compare a generous length of each fabric. Hold it from one edge: does it form soft folds or project outward? Fold it over your hand: does the fold hold its shape or collapse? Gently pull it across and along the grain, then release it. Note its stretch and recovery, as well as thickness and weight. Similar fibre names do not guarantee that two fabrics will carry seams, pleats or unsupported areas alike.
Match the property that matters most to the design. A stable test fabric can reveal shoulder position, dart placement and basic circumference in a fitted woven bodice. A loose dress that falls from the bust needs a closer match in drape. Trouser tests need comparable weight and give to make observations at the seat and knees useful. Closet Core Patterns advises that muslin fabric should mimic the intended garment fabric, including using a knit for a knit garment.
An exact match may be impractical. Label the difference before fitting: “firmer than final fabric”, “similar drape but less stretch” or “same weight, different surface”. If the garment will be underlined, compare the final cloth and underlining together. Closet Core’s underlining guidance recommends layering samples to assess their combined drape and structure.
Compare samples on the same grain as the pattern pieces. A bias-cut section can behave unlike a section cut on the straight grain, even within one fabric. Where the design has a hanging panel or gathered area, let enough fabric hang freely to see its shape. A narrow strip or tightly held corner can conceal the difference you need to judge.
Set the questions before cutting
Write down what might change the pattern: a shoulder seam's position, room at the hip, or the line of the hem. Include a fabric question where needed. A firm muslin might confirm a shoulder adjustment without settling how a soft skirt will hang.
Check the pattern’s body and finished garment measurements. Their difference is ease, which allows movement and helps create the design's shape. The Seamwork explanation of wearing and design ease helps distinguish those purposes. If the muslin looks wide, compare its measured circumference with the pattern's finished measurement and line drawing before taking in seams. Stiff fabric can make intended fullness appear more pronounced.
Build enough of the test to reproduce the area under review. A bodice alone can answer a shoulder question, but cannot show how a full skirt affects the waist seam. Include sleeves when arm movement or sleeve weight matters. Use a temporary closure at the intended overlap, wear the planned underlayers, and press the seams. An unpressed ridge can resemble a fit problem.
Use the pattern's intended seam allowance and attachment points in the tested area. Otherwise, a change in seam placement can be mistaken for a fabric effect. Mark the waist or hip level on both the muslin and your body so you can see whether fabric weight pulls the garment down or whether a seam was sewn in the wrong place.
Mark stitch lines and assess fit
Mark actual stitch lines, not just cut edges. Mark grainlines, centre front and back, darts, notches, and useful horizontal levels such as bust, waist and hip. These references show whether a seam has shifted or the garment hangs out of balance. They also give you a reliable way to transfer a correction.
Baste the test so seams can be reopened. Try it on, move as you would in the finished garment, and examine front, side and back. Pin a proposed change along its new stitch line, then move again. A fold that looks tidy while standing may restrict sitting or reaching. Mark both pieces of an altered seam and label the original and proposed lines. Pins alone are not a record.
Keep observations separate from explanations. “Diagonal folds run from the side seam toward the hip” describes what you see; “the hip needs more width” is only one possible cause. In a stiffer test fabric, check grain placement, measurements and reference lines before changing the pattern. Baste one substantial adjustment at a time and assess it in the same posture and underlayers.
Know when to make a second test
Make a second test before cutting the final pieces if the first fabric behaves differently at a feature that determines your alteration. Do so if stiff cloth makes you want to remove fullness from a flowing design, a low-stretch test suggests adding width to a stretchy garment, or an underlined final fabric hangs differently from the single-layer test. Test again if you cannot tell whether the problem is in the pattern or the cloth. The first muslin has identified the uncertainty, not resolved it.
The second test need not repeat every detail. Use a more comparable fabric and sew the portion that could change your decision, with enough connected pieces and length to show its hang. To judge a skirt, include its waist attachment and intended length rather than relying on a small square. To judge a sleeve, include the bodice. Mark the same reference lines and compare both versions at the same points. If only the final fabric reproduces the behaviour, use a suitable offcut for a targeted test where possible.
Do not repeat a settled measurement in another unrelated cloth. If the first muslin clearly shows a misplaced shoulder seam and the result does not depend on drape, record that correction. Direct the closer-fabric test towards the uncertain hem, fullness or stretch response.
Transfer only confirmed changes
Draw each confirmed stitch line cleanly on the muslin. Check that adjoining seam lengths still meet, that darts and notches remain identifiable, and that paired pieces agree where the design calls for symmetry. Transfer the correction to the paper pattern or a stable set of marked test pieces. Recheck grainlines and add the appropriate seam allowances after settling the stitching lines. Following an old cut edge can undo a successful fitting.
For an underlined garment, the marked muslin can guide transfer of stitch lines and construction marks to the underlining. Check that the alteration was confirmed with fabric behaviour comparable to the finished layers before transferring it. Record the test fabrics, their differences from the final cloth, confirmed changes and any behaviour to watch during assembly.
At final cutting, lay out the corrected pattern on the final fabric using its required grain direction. Check that paired pieces are aligned consistently and that the tested seam positions are marked. If the fabric shifts while cutting, pause and verify the pieces against the confirmed pattern lines before sewing. That check protects the fit decision you made in the muslin.