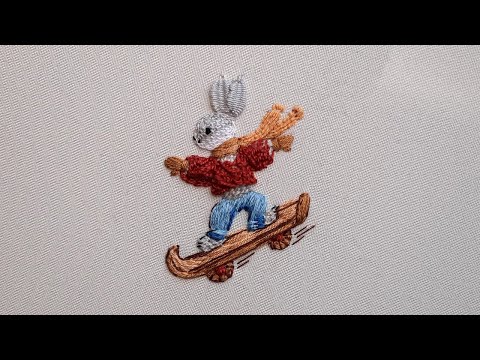
Bunny embroidery has become increasingly popular in recent years, as people look for unique and creative ways to personalize their crafts. This adorable form of embroidery involves stitching cute bunny designs onto various fabrics, adding a touch of whimsy and charm to any project. Whether you’re a seasoned embroiderer or just starting out, bunny embroidery is a fun and enjoyable way to express your creativity.
One of the main reasons why bunny embroidery has gained such popularity is because it allows individuals to add a personal touch to their crafts. By stitching cute bunny designs onto fabric, you can create one-of-a-kind pieces that reflect your own style and personality. Whether you’re embellishing a pillow, a tote bag, or a piece of clothing, bunny embroidery adds a playful and whimsical element that is sure to make your project stand out.
Key Takeaways
- Bunny embroidery is a fun and cute way to personalize your crafts.
- To get started, you’ll need embroidery floss, needles, embroidery hoop, and fabric.
- Choosing the right fabric is important for your bunny embroidery project.
- Basic stitches and tips can help you create cute designs, while appliqué and 3D elements can add dimension.
- You can find inspiration and free designs for bunny embroidery patterns, and personalize your project with custom details.
Bunny Embroidery Supplies: What You Need to Get Started
To get started with bunny embroidery, you’ll need a few essential supplies. These include:
1. Embroidery hoop: This is used to hold the fabric taut while you stitch. It comes in various sizes, so choose one that suits the size of your project.
2. Embroidery needles: These needles have larger eyes and sharp points, making it easier to thread them with embroidery floss.
3. Embroidery floss: This is the thread used for stitching. It comes in a wide range of colors, allowing you to create vibrant and colorful designs.
4. Fabric: Choose a fabric that is suitable for embroidery, such as cotton or linen. Make sure it is smooth and free from wrinkles or creases.
5. Scissors: You’ll need a pair of sharp scissors for cutting the embroidery floss and trimming any excess fabric.
6. Transfer method: There are various methods for transferring your bunny design onto the fabric, such as using transfer paper, a lightbox, or tracing the design directly onto the fabric.
Choosing the Right Fabric for Your Bunny Embroidery Project
When it comes to choosing the right fabric for your bunny embroidery project, there are a few things to consider. Firstly, you’ll want to choose a fabric that is suitable for embroidery, such as cotton or linen. These fabrics have a smooth surface that is easy to stitch on and allows the embroidery floss to glide smoothly through the fabric.
Additionally, consider the color and pattern of the fabric. If you’re stitching a colorful bunny design, you may want to choose a solid-colored fabric that will allow the design to stand out. On the other hand, if you’re stitching a more intricate design, you may want to choose a fabric with a subtle pattern that complements the design.
Lastly, consider the weight and texture of the fabric. If you’re stitching a small and delicate bunny design, you may want to choose a lightweight fabric that will allow for finer stitches. However, if you’re stitching a larger and more detailed design, you may want to choose a heavier fabric that will provide more stability and support for the stitches.
Bunny Embroidery Techniques: Basic Stitches and Tips for Creating Cute Designs
| Technique | Description |
|---|---|
| Satin Stitch | A smooth and shiny stitch used for filling in large areas. It is worked by stitching closely spaced straight stitches in a horizontal or vertical direction. |
| Backstitch | A strong and versatile stitch used for outlining and adding details. It is worked by stitching one stitch forward and then one stitch back, creating a solid line. |
| French Knot | A decorative stitch used for adding texture and dimension. It is worked by wrapping the thread around the needle several times before inserting it back into the fabric. |
| Running Stitch | A simple and quick stitch used for gathering and basting. It is worked by stitching in and out of the fabric in a straight line. |
| Tips | Use a hoop to keep the fabric taut and prevent puckering. Choose the right needle size and thread type for your project. Practice on a scrap piece of fabric before starting your design. |
Bunny embroidery involves using various basic embroidery stitches to create cute and unique designs. Some of the most commonly used stitches in bunny embroidery include:
1. Backstitch: This stitch is used for outlining and creating fine details in your bunny design. It involves stitching one stitch forward and then bringing the needle back through the previous stitch.
2. Satin stitch: This stitch is used for filling in larger areas of your bunny design. It involves stitching parallel rows of straight stitches close together until the area is completely filled.
3. French knot: This stitch is used for creating small dots or textured areas in your bunny design. It involves wrapping the embroidery floss around the needle several times before inserting it back into the fabric.
4. Lazy daisy stitch: This stitch is used for creating petals or leaves in your bunny design. It involves stitching a loop and then securing it with a small straight stitch.
When creating cute and unique designs in bunny embroidery, there are a few tips to keep in mind. Firstly, consider the size and scale of your design. If you’re stitching a small and intricate design, you may want to use finer embroidery floss and smaller stitches. On the other hand, if you’re stitching a larger and more detailed design, you may want to use thicker embroidery floss and larger stitches.
Additionally, consider the placement of your design on the fabric. Think about how the design will look once it’s stitched onto the fabric and how it will interact with any other elements or patterns on the fabric. Experiment with different placements and orientations to find the most visually pleasing arrangement.
Adding Dimension to Your Bunny Embroidery with Appliqué and 3D Elements
To add dimension to your bunny embroidery projects, you can incorporate appliqué and 3D elements into your designs. Appliqué involves stitching fabric shapes onto your base fabric to create a layered effect. You can use different fabrics in various colors and patterns to add depth and texture to your bunny design.
To create appliqué in bunny embroidery, start by cutting out the desired shape from a piece of fabric. Then, stitch around the edges of the shape using a small running stitch or a blanket stitch. Finally, attach the appliqué shape to your base fabric by stitching it in place.
In addition to appliqué, you can also add 3D elements to your bunny embroidery projects. This can include using materials such as felt or fabric scraps to create raised areas or textured details on your design. For example, you can create fluffy tails or raised ears by stitching layers of fabric or felt onto your base fabric.
Bunny Embroidery Patterns: Where to Find Inspiration and Free Designs
If you’re looking for inspiration and free designs for your bunny embroidery projects, there are several resources available. One of the best places to find bunny embroidery patterns is online. There are many websites and blogs dedicated to embroidery that offer free patterns and tutorials.
You can also find inspiration for your bunny embroidery projects in books and magazines. Look for books on embroidery or crafts that feature bunny designs. These resources often provide step-by-step instructions and templates for creating your own bunny embroidery designs.
Another great source of inspiration is nature itself. Take a walk outside and observe bunnies in their natural habitat. Pay attention to their shapes, colors, and movements, and use these observations to create your own unique bunny embroidery designs.
Personalizing Your Bunny Embroidery: Adding Names, Dates, and Custom Details
To add a personal touch to your bunny embroidery projects, consider adding names, dates, or custom details to your designs. This can be done by stitching letters or numbers onto your fabric using the same embroidery techniques as before.
To stitch letters or numbers onto your fabric, start by drawing or printing out the desired design onto paper. Then, transfer the design onto your fabric using one of the transfer methods mentioned earlier. Finally, stitch over the design using a backstitch or satin stitch.
In addition to names and dates, you can also add custom details to your bunny embroidery designs. This can include adding accessories such as bows or hats to your bunnies, or incorporating other elements such as flowers or butterflies into the design. Get creative and have fun with it!
Creative Ways to Use Bunny Embroidery: Ideas for Home Décor, Gifts, and More
Bunny embroidery can be used in a variety of creative ways to enhance your home décor, create unique gifts, and more. Here are a few ideas to get you started:
1. Home décor: Stitch a cute bunny design onto a pillow, a wall hanging, or a table runner to add a touch of whimsy to your home. You can also frame your bunny embroidery and hang it on the wall as a piece of art.
2. Clothing and accessories: Embroider a bunny design onto a t-shirt, a tote bag, or a hat to create personalized clothing and accessories. This is a great way to show off your love for bunnies and add a unique touch to your wardrobe.
3. Baby items: Stitch a bunny design onto a baby blanket, onesie, or bib to create adorable and personalized baby items. This is a thoughtful and heartfelt gift for new parents or parents-to-be.
4. Gifts: Create personalized gifts for friends and family by stitching bunny designs onto items such as tea towels, aprons, or handkerchiefs. This adds a personal touch and shows that you put thought and effort into the gift.
Troubleshooting Common Bunny Embroidery Problems: How to Fix Mistakes and Improve Your Skills
Like any craft, bunny embroidery can come with its fair share of challenges. Here are some common problems that may arise during the embroidery process and how to fix them:
1. Tangled embroidery floss: If your embroidery floss becomes tangled while stitching, take a deep breath and resist the urge to pull on it. Instead, gently untangle the floss using your fingers or a needle. If the tangles are too severe, you may need to cut the floss and start again.
2. Uneven stitches: If your stitches are uneven or inconsistent in size, try adjusting the tension of your embroidery hoop. Make sure the fabric is taut but not too tight, as this can cause the stitches to pucker or distort.
3. Puckered fabric: If your fabric is puckering or wrinkling while you stitch, try using a smaller embroidery hoop or adjusting the tension of your stitches. You can also try using a stabilizer or backing fabric to provide extra support and prevent puckering.
4. Mistakes in the design: If you make a mistake in your bunny embroidery design, don’t panic! Simply remove the stitches using a seam ripper or small scissors and start again. Remember, mistakes are a natural part of the creative process, and they can often lead to new and unexpected designs.
To improve your bunny embroidery skills, practice regularly and experiment with different stitches, fabrics, and designs. Don’t be afraid to try new techniques or take on more challenging projects. The more you practice, the more confident and skilled you will become.
Embrace Your Inner Bunny Lover with Adorable and Fun Embroidery Projects
In conclusion, bunny embroidery is a fun and cute way to personalize your crafts and add a touch of whimsy to any project. By using basic embroidery stitches and incorporating appliqué and 3D elements, you can create unique and adorable designs that reflect your own style and personality.
Whether you’re stitching home décor items, creating personalized gifts, or simply enjoying the process of embroidery, bunny embroidery offers endless possibilities for creativity. So embrace your inner bunny lover and start stitching today!
If you’re passionate about bunny embroidery, you might also be interested in the art of pattern drafting. It’s an essential skill for aspiring designers and can greatly enhance your embroidery projects. In fact, understanding pattern drafting can help you create unique and intricate bunny designs that truly stand out. To get started, check out this informative article on the essential supplies for aspiring designers: The Art of Pattern Drafting: Essential Supplies for Aspiring Designers. It provides valuable insights into the tools and materials you’ll need to embark on your pattern drafting journey. Happy stitching!
FAQs
What is bunny embroidery?
Bunny embroidery is a type of embroidery that features designs of rabbits or bunnies. It involves stitching thread onto fabric to create a decorative pattern.
What materials are needed for bunny embroidery?
To create bunny embroidery, you will need fabric, embroidery thread, embroidery needles, embroidery hoops, and a pattern or design to follow.
What types of stitches are used in bunny embroidery?
Bunny embroidery can use a variety of stitches, including backstitch, satin stitch, French knot, and stem stitch. The choice of stitch will depend on the design and effect you want to achieve.
What can bunny embroidery be used for?
Bunny embroidery can be used for a variety of purposes, including decorating clothing, creating wall art, and making home decor items such as pillows or table runners.
Is bunny embroidery difficult to learn?
Bunny embroidery can be learned by anyone with patience and practice. There are many tutorials and resources available online to help beginners get started.
Can bunny embroidery be done by hand or machine?
Bunny embroidery can be done by hand or machine. Hand embroidery is more traditional and allows for more intricate designs, while machine embroidery is faster and more efficient for larger projects.